
I'm here to tell you!
I should warn you ahead of time though: while this cake is definitely not hard to make, it is VERY time consuming. But also totally worth it. I don't think I have ever gotten so many compliments before on something I've made!
Let's begin, shall we?
For the cake, you will need:
2 boxes of white cake mix (Ok, I usually make my cakes from scratch but in this case, that would have been even MORE work. And the cake mixes I used (Betty Crocker) were actually quite delicious.)
Food coloring (I used gel coloring that I got at the craft store. It comes in ALL colors and is the only way you will get a true purple or orange.)
Make up the first cake mix and separate it into three bowls (about 1 1/2 cups per bowl). Color one bowl of cake mix blue, another green and the third bowl purple.

Pour each one of these bowls of batter into a 9-inch cake pan and bake according to the directions on the box. Remember to check the cakes about 10 minutes before they should be done. With less batter in the pans, they tend to cook faster.
Mix up the second cake mix and repeat the coloring process, this time with red, orange and yellow. Bake these three cakes the same way.
Let all six cakes cool completely. Using a bread knife, cut into the cakes horizontally to even them out. They tend to have dips and valleys baked into them and you want the tops to be level. This is important so that the colors will display evenly when the completed cake is cut. Your rainbow will appear warped and not even unless you level the tops of each cake first.

To make the frosting you will need:
4 (8 oz.) packages of cream cheese, softened
1 cup butter, softened
5-6 cups powdered sugar
1 T vanilla
To make the frosting:
Mix together room temperature cream cheese and butter until well combined. Add vanilla and combine. Slowly add the powdered sugar. After the 5th cup, taste the frosting. If you would like it sweeter, add the 6th cup (I did). If you like it the way it is, leave the 6th cup out.
To assemble the cake:
Start your assembly with the purple layer. Lay your purple cake on your cake stand or plate. Frost the cake with enough frosting to spill over the edges. Use the flat side of a large knife to smooth out the frosting on the cake.
Add the blue layer of cake on top of the purple one. Again, frost to top of the cake with enough to spill over the edges. Use your knife to smooth out the frosting. This time, also run the edge of the knife along the outside of the cakes to smooth the edges.
Put the cake in the refrigerator for at least 2 hours or the freezer for 1 hour.
Repeat with the green layer, and then the yellow layer.
Put the cake in the refrigerator for at least 2 hours or the freezer for 1 hour.
Repeat with the orange layer and finally with the red layer.
It really helps to freeze the cake between assembling layers. The cake can start to get really heavy by the time you add the 4th layer or so and if it is partially frozen at this point (or at least chilled), it will hold up much better. In addition, it is easier to frost a cold cake than it is to frost one that is wobbling all over the place! :)
Cover the cake with frosting and run the smooth, flat side of a knife all over and around your cake to smooth it out nicely. Add wording or decorations with royal icing. You can also add frosting and food coloring to a pastry bag and add little dollops of frosting around the bottom edge of the cake, but clearly I forgot to do that. :)
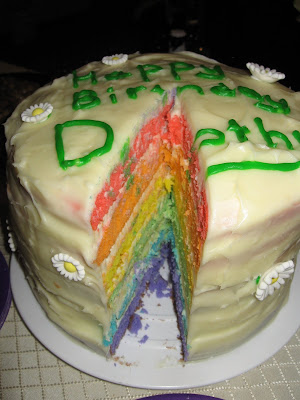
Voila! Beautiful Rainbow Cake!

No comments:
Post a Comment